

Why does Deltec Fluidize the Media? With Deltec Fluidized Calcium Reactors, fluidizing the smaller grains of media ensures that the whole of the surface of the media is always available for reaction with the low pH water within the chamber. On a standard non fluidizing calcium reactor the water always finds the easiest route through the media and forms channels or tracks which can result in only a small area of the media being utilised.
Deposits of fine media build up within a standard reactor which choke up the pathways further and require regular maintenance and cleaning out to maintain a reasonable level of efficiency. With Deltec calcium reactors the fine grains of media are kept in suspension and pushed out of the reactor with the water which means that the media never needs to be emptied out and cleaned but simply topped up.
The Deltec PF509 Calcium Reactor is the starting model of a new fifth generation of Deltec Fluidised Calcium Reactors which now comes with a full bayonet fitting on the top for full and easy access to the media. The Deltec PF509 Calcium Reactor is suitable for tanks up to 500 litres, so is great for those with a smaller tank who may upgrade.
It is the 'baby' of Deltec's 5th generation range of Fluidised Calcium Reactors. It is more than capable however of providing the correct level of calcium for a small to medium sized reef tank. It has a new bayonet style fitting which makes cleaning and maintenance quick and easy.
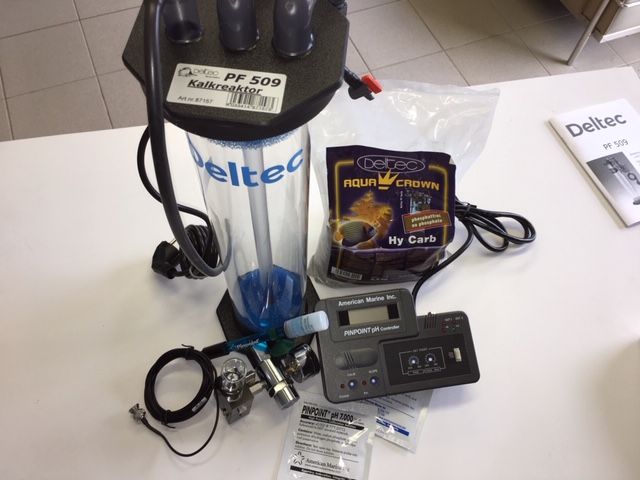
It comes complete with 2kg of Deltec Hy Carb media.
We recommend you add Amercian Marine Pinpoint CO2 Regulator Kit and American Marine Pinpoint pH Controller (includes pH probe), then you will have everything that you need to plug and play.
Specifications:
Calcium Reactors are excellent systems designed to add a steady amount of natural elemental calcium and minerals to a marine aquarium system. This is achieved by the careful addition of CO2 gas to the system seawater, thus lowering its pH to the acidic range and passing this seawater through aragonite coral chips housed inside the reactor (see diagram below).
Because the CO2 treated seawater has a pH in the range of 6.6 – 6.8 (or lower); it will readily dissolve aragonite coral chips housed inside the calcium reactor. This enriched calcium seawater, also called effluent, should be sufficiently aerated to drive off the CO2 and return the pH to the normal range while still carrying the additional calcium in solution before it is re-introduced back into the aquarium.
You will be controlling the pH of the fluid inside the reactor. Generally speaking a pH of 6.6 – 6.8 (or lower) will readily dissolve aragonite media. If the pH of the seawater surrounding the aragonite is too low, the aragonite will turn to “mush” and no longer have fluid flow through the chips. If the pH is too high there will not be a sufficient acid environment to dissolve the aragonite. Trial and error with your brand of aragonite should be performed.
*** Note: Properly designed Calcium Reactor Systems will add natural elemental calcium and minerals to your system and will have virtually no effect on the pH of the aquarium.
There are several equipment considerations:
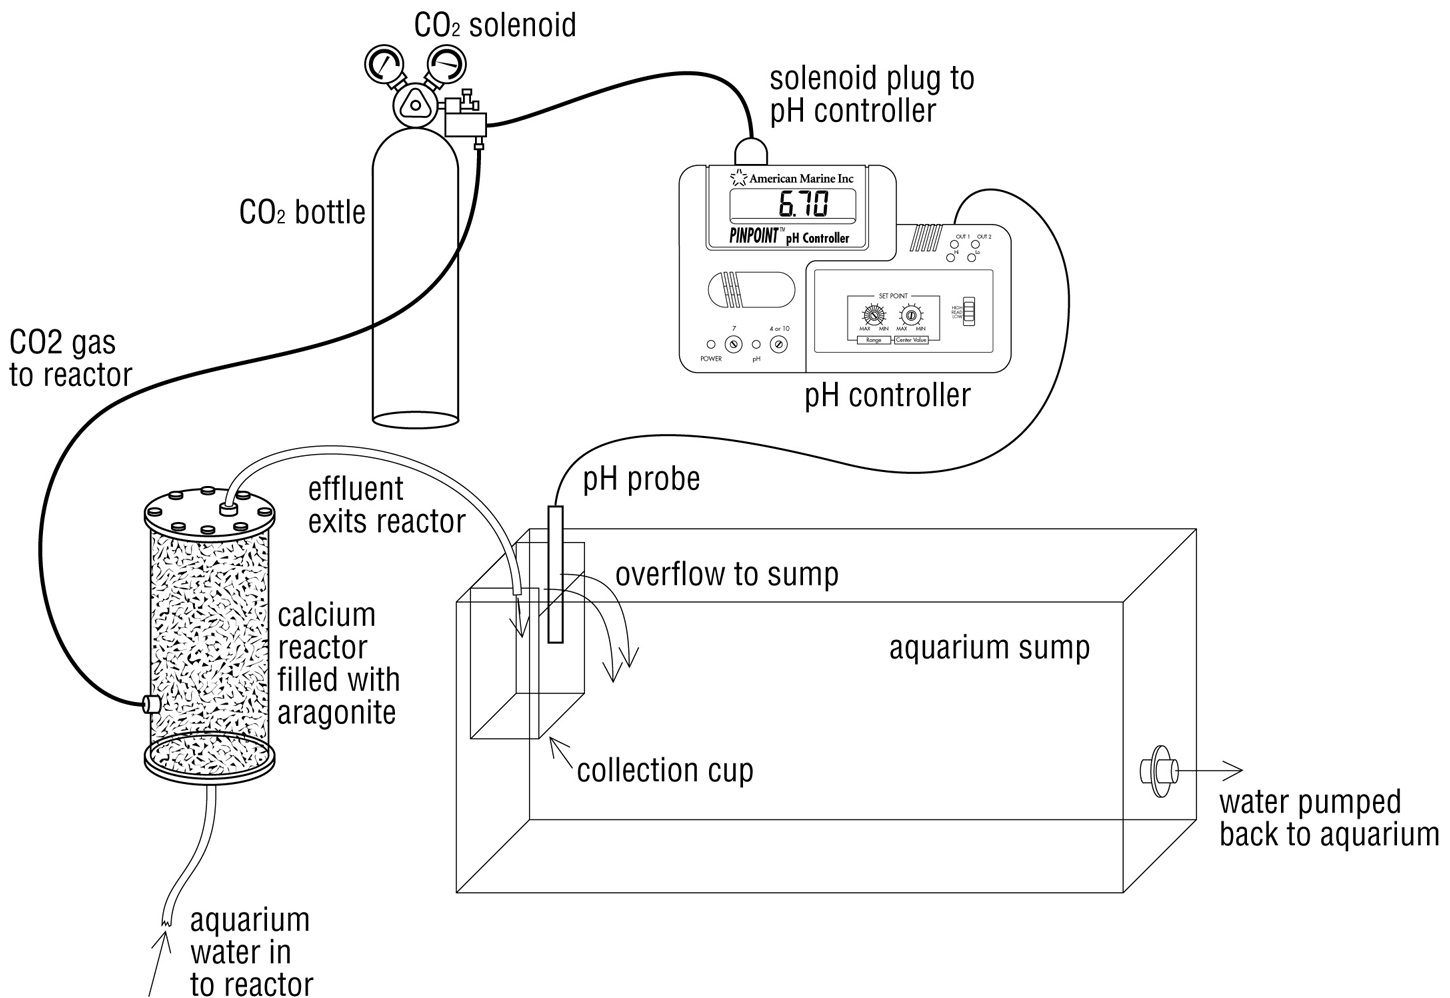
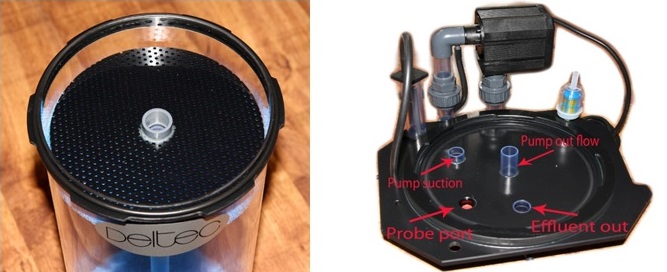
Calcium Reactor – houses the aragonite chips and has a mechanism to infuse CO2 gas inside the reactor. Some models have a built-in port to accommodate a pH probe. Many reactors do not have a port. Models without a port should have the output water (effluent) exit the reactor and collect in a small cup located in the sump area (see diagram). The probe of the pH Controller should be installed in the collection cup so as to measure the pH of the seawater from the Calcium Reactor. As this collection cup fills, it will overflow into sump where it should be properly aerated to drive off the CO2 and return the pH back to normal seawater levels before it enters the aquarium. An airstone or aerating powerhead in the sump area can be beneficial.
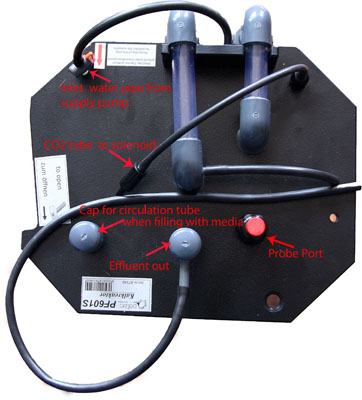
CO2 Tank or Bottle – This will be your source of CO2 gas. Obviously CO2 gas when mixed with seawater will lower the pH of seawater. CO2 bottles are easily, and inexpensively, refilled at any welding supply store or any outlet that will recharge fire extinguishers.
Electric CO2 Solenoid – An electrically activated valve that when energized by the outlet on the back of the PINPOINT® pH Controller, will allow CO2 gas to exit the CO2 bottle to be released in the aragonite of the Calcium Reactor. This CO2 gas will quickly lower the pH of the seawater inside the reactor. A bubble counter, if available, will visually indicate the volume of CO2 exiting the bottle. This gas volume can be adjusted via the needle valve on the solenoid.
Aragonite – Basically coral fragment. You should experiment to find the pH levels that will dissolve the aragonite most efficiently. If the pH is too low the aragonite will turn to “mush” and no longer have flow through it. If the pH is too high then the aragonite will not be dissolved sufficiently.
PINPOINT® pH Controller – The electronic pH measurement and control device that will activate the CO2 solenoid to start or stop the CO2 gas flow to the reactor. Not all pH Controllers can control devices that will influence pH in both an increasing and a decreasing pH direction as needed. The PINPOINT® pH Controller is perfectly suited for any calcium reactor application by controlling pH downward during CO2 addition. It will also control pH upward by using a regular air pump to drive off the CO2 from seawater. Typical setpoints would be to begin the CO2 flow at a pH of 6.8 and stop the CO2 flow when the pH of 6.6 is reached.
The PINPOINT® pH Controller will:
Some hobbyists want to place the pH electrode directly into the aquarium water. Their objective is to use the pH controller as a safety device to shut off the CO2 gas in the event the aquarium pH becomes too low because the effluent containing the CO2 is being introduced back to the aquarium water at too fast a rate and/or without proper aeration.
Pros
If you find yourself a little lost after unpacking your new calcium reactor you may well find the step by step guide below quite useful. Fear not calcium reactors are quite simple to set up so don't let all those spiralling pipes confuse you...all will become clear! A Deltec PF601 calcium reactor is shown in photos below, but all other PF calcium reactors within the range will be similar.
Step 1
Unpack the reactor and check all components for damage
Step 2
Before you turn your attention to the reactor itself we advise you to wash the reactor media first. I hear you all mumble 'boring' under your breath but you may as well get it out of the way now rather than halfway through assembly. The majority of calcium reactor media's only get an initial prewash before being packed and this results in the media being rather dusty from the bag, transport vibration will also cause clean media's to rub together and produce dust so its always wise to wash the media well before use.
Empty the media so it fills around 1/4 of a salt bucket and wash well with a hose pipe, when the media runs clear swap it out with another batch untill the correct amount for the reactor is clean. Now place all the media into a bucket of RO water to rinse out the tap water that may contain high Nitrate and Phosphate. Leave this for a few hours then drain well, the media should now be ready for use.
Before After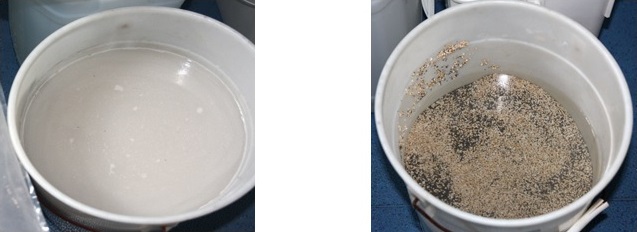
Step 3
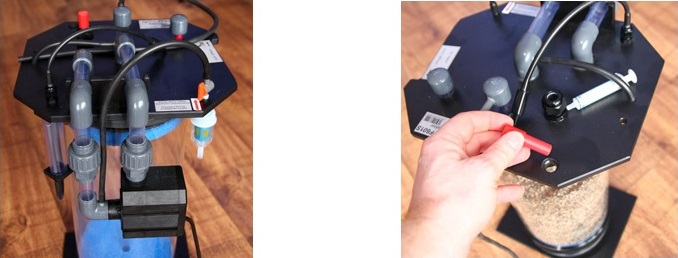
Remove the lid of the reactor in an anti-clockwise direction and check the sponges are in the correct position, the coarse blue sponge should be at the bottom of the reactor and the finer at the top to prevent fines from entering the pump. Now remove the fill cap from the lid of the skimmer and place it on the end of the long recircualtion pipe that runs down to the perforated plate at the bottom of the skimmer. The cap will prevent media from dropping into the pipe when filling and blocking the plate from underneath when running.
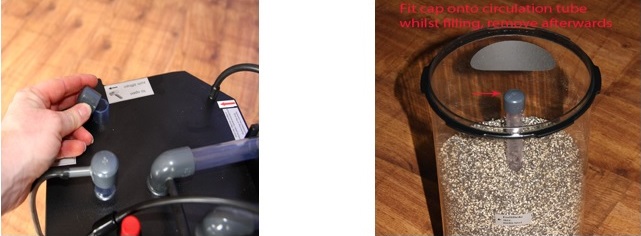
When filling the reactor with media keep the pipe straight as you add the media so it doesnt lean off center, fill with media to the fill level label on the side of the body and when done hold the clear pipe in place with one hand and pull off the cap. If you dont hold the clear pipe you could pull it out of the reactor body whilst removing the cap and media will fall into the the hole in the perforated plate below and you will have to empty and start over.
Step 4
Now you have filled the reactor position it and fill the body of the reactor with aquarium water up to around 3 inches to the top of the clear body. Now fit the finer blue sponge onto the perforated plate that sits on top of the clear recirculation pipe and fit it (sponge down) onto the pipe.You can now fill the body of the reactor almost to the top without fear of displacing and spilling water due to fitting the sponge. Poor the water down the center hole rather than through the perforated plate as this may move the sponge that sits under the plate out of position.
Now align the bayonet on the lid with the body of the reactor and turn it clockwise to engange the bayonet.The center pipe under the lid (pump out flow)should also align with the top perorated plate and drop into it. When you feel the lid grip the o-ring turn the lid a couple more degrees and it should be water tight, there is no need to over tighten the lid and this could actually break the bayonet. Make sure there is no debris from the media on the o-ring before you replace the lid as this will break the seal, a light smear of slicone grease around the o-ring will help with installation and produce a better seal.
Dont expect the lid shape to line up with the shape of the foot, this is a design detail of the lid and you could overtighten the lid by trying to rotate it to align squarely with the foot.
Step 5
Now the reactor is in place and full with water and media its time to connect up the pipework. The first job will be to connect up the feed water pipe to the reactor. You can feed the reactor by either using a peristaltic pump, T off an existing pump, run a supply from a small pump via an adaptor or gravity feed it from the main tank.
The pipe from the feed pump will need to be connected to the filter that sits under the lid (as pictured above), if using a peri pump (we recommend Kamoer FX-STP) you can remove the adjustment tap that sits on top of the lid above the filter if you wish as the peri pump will control the flow rate.For all other pump applications you should use the tap to control the effluent rate at the inlet side. Do not attempt to install a tap on the outflow side of the reactor as this may pressurise reactor and cause it to leak.
The inlet pipe runs directly to the recirculation pump, the pump then forces the new feed water to the bottom of the reactor and through the media so no feed water ever escapes to effluent without running through the media....which is nice.
After some time the filter may become blocked, this can be replaced with a new filter or removed if there is little chance of sand or foreign objects being sucked into the feed and then into the pump on the reactor as this will damage it. The effluent out pipe can now be run back to the sump from the reactor, i would advise you do not submerge the pipe as you will not be able to observe the drip rate from the reactor. Run the water back to a high flow section of the sump to help blow off any CO2 in the effluent and help promote a rise in local Ph.
We can now move onto rigging up the CO2 pipework, you should have your CO2 cylinder,gauges and solenoid in place so you simply run a length of pipework from the solenoid to the CO2 non return valve on the reactor. The non return valve prevents water from pushing back from the reactor and into the bubble counter when the solenoid/CO2 is switched off. The water would then continue to travel up into the solenoid and gauges and damage both so its most important the valve is in place,working and installed the correct way around. The gauges should be set to around 1-1.5 bar on the secondary gauges.
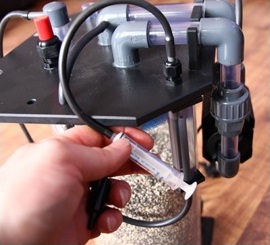
If you wish to place a pH probe into the lid of the reactor to control or monitor the internal pH then loosen the domed black plastic nut on the pH port and remove the red blanking plug. There is a hole in the lid where you can place the plug for storage. Push the probe into the port carefully until you feel it come in contact with the perforated plate now pull it out by around 20mm to clear the plate. Now hand tighten the black port nut, this will compress the built it o-ring around the probe for a water tight seal. Be sure you do not push the o-ring into the port when installing the probe as the port will leak if you do!!!
The PF509 reactors do not come with a pH port but if you wish you can run the effluent into a small vessel containing a pH probe and allow the vessel to overflow back into the sump.
Step 6
Now with the pipework connected you will need to make final adjustments before running for the first time. Remove the the soft black silicone pipe at the non return valve and top up the bubble counter with RO water, i used a syringe for this.
Reconnect this pipe and check all connections are tight, now open the little red inlet control tap fully and turn on your feed pump. Leave the reactor recirc pump off for now and run the pump until water starts to run from the effluent pipe. Give the reactor a bit of a shake to force any trapped air to the top and wait for all the air to escape from the effluent pipe.
When the reactor is clear of air turn on the recirculation pump, if using Rowalith C+ media the media should start to slowly fluidise within the reactor. I have used large coral skeleton in the PF601s( 20-30mm) with excellent results, dont expect this to fluidise though.
Now reduce the effluent flow to around 30 drips per minute and the bubble rate to around 15 bubbles per min and refer to the following pages to tune the reactor for best output.
SETTING UP THE REACTOR
Deltec Calcium Reactors are fitted with a pH probe holder, (except PF509), however we do not believe that you need to use a pH controller to get the most out of the unit.
Calcium reactors work by reducing the acidity, pH of the water passing through it using CO2 until it dissolves the calcium carbonate which is held inside. This breaks down the media into calcium ions and carbonate ions both of which are required for growth of corals and buffering of the water.
Having installed the equipment according to the instructions you will need to balance the reactor to the demands of your aquarium. The reactor balances 3 parameters which are interlinked and all affect the calcium output from the reactor:
After running at the starting level for 1-2 hours use an accurate test kit to measure the Dkh of the water flowing out of the reactor as this gives a relative measurement of the calcium level of the water. Deltec reactors can achieve a dkh of up to 80 when set up and operating at their max however we would recommend that you start with a level of 45-50.
Test kits like those by Salifert will only measure up to 16 Dkh from the contents of one syringe. Add a second and so on to read 32 and 48 from this test.
If the Dkh is lower than 45-50 then increase the CO2 bubble rate and leave the reactor to stand for another 2 hours before re-testing. The reactor is now running as it should be and the third adjustable parameter comes in to play.
During the day, whilst the lights are on, the algae within the corals use CO2 from the water for photosynthesis which naturally raises the pH. Use of a calcium reactor lowers the pH due to CO2 addition and therefore the best time to use it is whilst the lights are on to reduce this effect.
The ideal time for the reactor to run is therefore 9-12 hours per day whilst the lights are on. Set the solenoid on your CO2 set to switch the gas on and off for the relevent period of time - do not change the flow of water through the reactor.
Check the Dkh and calcium within your aquarium on a daily basis. If this is tending to rise then you can further reduce the period that the CO2 is switched on.
If it is tending to fall then you can either increase the time that the CO2 runs or increase the amount of water passing through the reactor. This second option would be recommended for the reasons explained above but means going back to the first steps where you increase and adjust the CO2 until the Dkh comes back into line at 45-50.
As the corals grow you will find that you need to adjust the 3 parameters accordingly to maintain a balance.
Topping up the Reactor
Remember that the only difference between the various increasing models of calcium reactor is the volume of media that each holds. It therefore makes no sense to allow the level in the reactor to fall too far before you top it back up again.
SETTING pH CONTROLLER
The pH needed to 'melt' the media will depend on the media used , typically though an internal reactor pH of between 6.1 - 6.5 will be required.
There are two key reactor settings that will need adjusting to tune the reactor and to maintain your systems demand for Calcium and Alkalinity. When setting up the reactor you will only need to test the effluent for Alkalinity as the reactor will produce Alkalinity and Calcium in balance. Therefore there is no need to check the effluent for Calcium if the reactor is producing the required levels of Alkalinity.
Effluent Rate:
To tune the reactor for best performance you first need to set the effluent rate. I suggest starting out with a slow drip rate of around 1 drop every two seconds (30 drops a minute). Once the reactor is set up this can be increased to match the demand of the tank. If using a fixed peristaltic pump ensure that it is rated correctly for the reactor. If the peristaltic pump specified or effluent output rate is set higher than the maximum working capacity of the calcium reactor you will find that the effluent Alkalinity (dkh ) will drop even if setting a very low pH within the reactor or high bubble rate. This is due to the contact time within the reactor being too short for the capacity of media it can hold.
Internal pH/Bubble Rate:
Once the initial effluent rate has been set we need to look at the CO2 bubble rate and if using a pH controller the internal pH of the reactor. If using a feed pump/variable drip rate set CO2 rate at a count of around twice that of the effluent drip rate, after leaving the reactor running for at least an hour check the effluent Alkalinity using an aquarium test kit (Salifert kit in low range mode is quite accurate). You are aiming for an effluent dkh of between 35-50dkh, if the effluent dkh is low increase the bubble rate slightly and test an hour later. Continue to do this until the target dkh is reached. This will be the optimum output for the reactor at the drip rate set.
If using a pH controller then set this initially to switch the C02 supply solenoid off at a ph of 6.5, adjust the CO2 bubble count to around 30 bubbles per minute to begin with. Leave this for two hours then check the controller display, the ph inside the reactor should have dropped down to the desired ph i.e. 6.5. If you find the pH has not dropped sufficiently slowly increase the bubble rate leaving an hour between each adjustment until the pH has dropped to that set on the controller.
Calcium reactors work best with a steady constant supply of CO2 so don't be tempted to crank up the bubble rate to reduce the ph quickly, this will result in the solenoid cycling on and off over short periods and possibly causing excess CO2 to build up in the reactor.
Once the desired pH has been reached check the effluent Alkalinity, the ideal Alkalinity should be between 35-50dkh. If the effluent Alkalinity is low drop the controllers pH by 0.1 and leave for an hour and check the effluent dkh again. You may find you have to increase the bubble rate with each adjustment of the controller to achieve the new pH limit set, this is normal. When you find the effluent dkh is between 35-50dkh your controller will be set at the correct pH required to 'melt' your media.
Remember to calibrate your pH probe before set up!
Final adjustments:
Once the reactor has been set up to achieve the optimum effluent alkalinity you will need to tune the reactor for system demand. With the reactor running check your systems alkalinity, write down the results and check the systems alkalinity again 24 hours later. If your systems alkalinity has dropped you will need to increase the output of the reactor to match demand. If using a feed pump adjust the effluent rate via the red control tap on the reactor ,you should aim to increase the output by around 25% from the base setting above. After an hour test the effluent dkh, if you find that effluent dkh has dropped increase the bubble rate to achieve the correct effluent dkh.
Check the aquarium alkalinity again 24 hours later and if needed follow the steps above to increase the reactors output again. Repeat these steps until you find the aquariums Alkalinity and Calcium demands are being met by the reactor.
If using a fixed peristaltic pump you can attempt to increase the reactors output dkh into its upper levels by increasing the bubble count, don't try and force the effluent dkh up too high though as this may result in the Media turning into a mush and CO2 building up in the reactor.
If using a pH controller you may wish to reduce the pH in the reactor in an attempt push up the effluent dkh, an internal ph of under 6.1 may result in gas building with the reactor and the media breaking down and becoming dusty.
It is important to test the Aquariums alkalinity 24 hours after any adjustment so demand can monitored and the reactor adjusted to suit as above It is advisable to only run the CO2 via a solenoid during the day and turn it off during the night, this is because the effluent from the reactor has a low pH.
During the day your aquarium pH will be higher due to coral/algae respiration within the aquarium. At night the pH will drop naturally and the reactor effluent may pull the aquarium pH down even further to undesirable levels, so depending on the pH stability of your system you may want to turn the CO2 off during the night and run it slightly harder during the day. Monitor the pH swing of the aquarium and if the pH swings by more than 0.2-0.3 during a 24 hour period it would be advisable to only run the Calcium reactor CO2 supply during the day. As an extra measure the use of a Kalkwasser stirrer that is set to dose during the night will help stabilise pH and add Calcium and Alkalinity to the system.
Key points:
Deposits of fine media build up within a standard reactor which choke up the pathways further and require regular maintenance and cleaning out to maintain a reasonable level of efficiency. With Deltec calcium reactors the fine grains of media are kept in suspension and pushed out of the reactor with the water which means that the media never needs to be emptied out and cleaned but simply topped up.
The Deltec PF509 Calcium Reactor is the starting model of a new fifth generation of Deltec Fluidised Calcium Reactors which now comes with a full bayonet fitting on the top for full and easy access to the media. The Deltec PF509 Calcium Reactor is suitable for tanks up to 500 litres, so is great for those with a smaller tank who may upgrade.
It is the 'baby' of Deltec's 5th generation range of Fluidised Calcium Reactors. It is more than capable however of providing the correct level of calcium for a small to medium sized reef tank. It has a new bayonet style fitting which makes cleaning and maintenance quick and easy.
It comes complete with 2kg of Deltec Hy Carb media.
We recommend you add Amercian Marine Pinpoint CO2 Regulator Kit and American Marine Pinpoint pH Controller (includes pH probe), then you will have everything that you need to plug and play.
Specifications:
- Mk5 Fluidised Calcium Reactor
- For use in saltwater aquariums only
- Pump: Aquabee UP 1000 - 07
- Media volume 2.2kg
- Dimensions L: 180mm x W: 140mm x H: 500mm
- For aquariums up to 500 litres
Calcium Reactors are excellent systems designed to add a steady amount of natural elemental calcium and minerals to a marine aquarium system. This is achieved by the careful addition of CO2 gas to the system seawater, thus lowering its pH to the acidic range and passing this seawater through aragonite coral chips housed inside the reactor (see diagram below).
Because the CO2 treated seawater has a pH in the range of 6.6 – 6.8 (or lower); it will readily dissolve aragonite coral chips housed inside the calcium reactor. This enriched calcium seawater, also called effluent, should be sufficiently aerated to drive off the CO2 and return the pH to the normal range while still carrying the additional calcium in solution before it is re-introduced back into the aquarium.
You will be controlling the pH of the fluid inside the reactor. Generally speaking a pH of 6.6 – 6.8 (or lower) will readily dissolve aragonite media. If the pH of the seawater surrounding the aragonite is too low, the aragonite will turn to “mush” and no longer have fluid flow through the chips. If the pH is too high there will not be a sufficient acid environment to dissolve the aragonite. Trial and error with your brand of aragonite should be performed.
*** Note: Properly designed Calcium Reactor Systems will add natural elemental calcium and minerals to your system and will have virtually no effect on the pH of the aquarium.
There are several equipment considerations:
- Calcium Reactor
- Aragonite Media
- CO2 Bottle
- Electric CO2 Solenoid
- PINPOINT® pH Controller
CO2 Tank or Bottle – This will be your source of CO2 gas. Obviously CO2 gas when mixed with seawater will lower the pH of seawater. CO2 bottles are easily, and inexpensively, refilled at any welding supply store or any outlet that will recharge fire extinguishers.
Electric CO2 Solenoid – An electrically activated valve that when energized by the outlet on the back of the PINPOINT® pH Controller, will allow CO2 gas to exit the CO2 bottle to be released in the aragonite of the Calcium Reactor. This CO2 gas will quickly lower the pH of the seawater inside the reactor. A bubble counter, if available, will visually indicate the volume of CO2 exiting the bottle. This gas volume can be adjusted via the needle valve on the solenoid.
Aragonite – Basically coral fragment. You should experiment to find the pH levels that will dissolve the aragonite most efficiently. If the pH is too low the aragonite will turn to “mush” and no longer have flow through it. If the pH is too high then the aragonite will not be dissolved sufficiently.
PINPOINT® pH Controller – The electronic pH measurement and control device that will activate the CO2 solenoid to start or stop the CO2 gas flow to the reactor. Not all pH Controllers can control devices that will influence pH in both an increasing and a decreasing pH direction as needed. The PINPOINT® pH Controller is perfectly suited for any calcium reactor application by controlling pH downward during CO2 addition. It will also control pH upward by using a regular air pump to drive off the CO2 from seawater. Typical setpoints would be to begin the CO2 flow at a pH of 6.8 and stop the CO2 flow when the pH of 6.6 is reached.
The PINPOINT® pH Controller will:
- automate the proper pH settings inside the calcium reactor
- save CO2 by using it only when necessary
- save aragonite by keeping the pH levels in the proper range
- allow easier adjustment of flow through the reactor by keeping pH in the proper range through a range of different fluid flow and CO2 volumes
- lower pH settings to dissolve more aragonite
- Increased CO2 flow to the reactor
- decrease (or increase) the water flow through the reactor
- install an aerating powerhead in the sump to drive out the CO2 gas and return the effluent to normal seawater pH levels before returning to the aquarium.
Some hobbyists want to place the pH electrode directly into the aquarium water. Their objective is to use the pH controller as a safety device to shut off the CO2 gas in the event the aquarium pH becomes too low because the effluent containing the CO2 is being introduced back to the aquarium water at too fast a rate and/or without proper aeration.
Pros
- You can use the PINPOINT® pH Controller to monitor the pH of your aquarium
- CO2 gas will be infused constantly whether it is actually needed or not
- You will not be able to monitor the pH of the seawater inside the reactor.
- Flow rate and CO2 input to the reactor will be more difficult to adjust and therefore the reactor pH will more easily be "out of optimal range" frequently too high or too low.
If you find yourself a little lost after unpacking your new calcium reactor you may well find the step by step guide below quite useful. Fear not calcium reactors are quite simple to set up so don't let all those spiralling pipes confuse you...all will become clear! A Deltec PF601 calcium reactor is shown in photos below, but all other PF calcium reactors within the range will be similar.
Step 1
Unpack the reactor and check all components for damage
Step 2
Before you turn your attention to the reactor itself we advise you to wash the reactor media first. I hear you all mumble 'boring' under your breath but you may as well get it out of the way now rather than halfway through assembly. The majority of calcium reactor media's only get an initial prewash before being packed and this results in the media being rather dusty from the bag, transport vibration will also cause clean media's to rub together and produce dust so its always wise to wash the media well before use.
Empty the media so it fills around 1/4 of a salt bucket and wash well with a hose pipe, when the media runs clear swap it out with another batch untill the correct amount for the reactor is clean. Now place all the media into a bucket of RO water to rinse out the tap water that may contain high Nitrate and Phosphate. Leave this for a few hours then drain well, the media should now be ready for use.
Before After
Step 3
Remove the lid of the reactor in an anti-clockwise direction and check the sponges are in the correct position, the coarse blue sponge should be at the bottom of the reactor and the finer at the top to prevent fines from entering the pump. Now remove the fill cap from the lid of the skimmer and place it on the end of the long recircualtion pipe that runs down to the perforated plate at the bottom of the skimmer. The cap will prevent media from dropping into the pipe when filling and blocking the plate from underneath when running.
When filling the reactor with media keep the pipe straight as you add the media so it doesnt lean off center, fill with media to the fill level label on the side of the body and when done hold the clear pipe in place with one hand and pull off the cap. If you dont hold the clear pipe you could pull it out of the reactor body whilst removing the cap and media will fall into the the hole in the perforated plate below and you will have to empty and start over.
Step 4
Now you have filled the reactor position it and fill the body of the reactor with aquarium water up to around 3 inches to the top of the clear body. Now fit the finer blue sponge onto the perforated plate that sits on top of the clear recirculation pipe and fit it (sponge down) onto the pipe.You can now fill the body of the reactor almost to the top without fear of displacing and spilling water due to fitting the sponge. Poor the water down the center hole rather than through the perforated plate as this may move the sponge that sits under the plate out of position.
Now align the bayonet on the lid with the body of the reactor and turn it clockwise to engange the bayonet.The center pipe under the lid (pump out flow)should also align with the top perorated plate and drop into it. When you feel the lid grip the o-ring turn the lid a couple more degrees and it should be water tight, there is no need to over tighten the lid and this could actually break the bayonet. Make sure there is no debris from the media on the o-ring before you replace the lid as this will break the seal, a light smear of slicone grease around the o-ring will help with installation and produce a better seal.
Dont expect the lid shape to line up with the shape of the foot, this is a design detail of the lid and you could overtighten the lid by trying to rotate it to align squarely with the foot.
Step 5
Now the reactor is in place and full with water and media its time to connect up the pipework. The first job will be to connect up the feed water pipe to the reactor. You can feed the reactor by either using a peristaltic pump, T off an existing pump, run a supply from a small pump via an adaptor or gravity feed it from the main tank.
The pipe from the feed pump will need to be connected to the filter that sits under the lid (as pictured above), if using a peri pump (we recommend Kamoer FX-STP) you can remove the adjustment tap that sits on top of the lid above the filter if you wish as the peri pump will control the flow rate.For all other pump applications you should use the tap to control the effluent rate at the inlet side. Do not attempt to install a tap on the outflow side of the reactor as this may pressurise reactor and cause it to leak.
After some time the filter may become blocked, this can be replaced with a new filter or removed if there is little chance of sand or foreign objects being sucked into the feed and then into the pump on the reactor as this will damage it. The effluent out pipe can now be run back to the sump from the reactor, i would advise you do not submerge the pipe as you will not be able to observe the drip rate from the reactor. Run the water back to a high flow section of the sump to help blow off any CO2 in the effluent and help promote a rise in local Ph.
We can now move onto rigging up the CO2 pipework, you should have your CO2 cylinder,gauges and solenoid in place so you simply run a length of pipework from the solenoid to the CO2 non return valve on the reactor. The non return valve prevents water from pushing back from the reactor and into the bubble counter when the solenoid/CO2 is switched off. The water would then continue to travel up into the solenoid and gauges and damage both so its most important the valve is in place,working and installed the correct way around. The gauges should be set to around 1-1.5 bar on the secondary gauges.
If you wish to place a pH probe into the lid of the reactor to control or monitor the internal pH then loosen the domed black plastic nut on the pH port and remove the red blanking plug. There is a hole in the lid where you can place the plug for storage. Push the probe into the port carefully until you feel it come in contact with the perforated plate now pull it out by around 20mm to clear the plate. Now hand tighten the black port nut, this will compress the built it o-ring around the probe for a water tight seal. Be sure you do not push the o-ring into the port when installing the probe as the port will leak if you do!!!
The PF509 reactors do not come with a pH port but if you wish you can run the effluent into a small vessel containing a pH probe and allow the vessel to overflow back into the sump.
Step 6
Now with the pipework connected you will need to make final adjustments before running for the first time. Remove the the soft black silicone pipe at the non return valve and top up the bubble counter with RO water, i used a syringe for this.
Reconnect this pipe and check all connections are tight, now open the little red inlet control tap fully and turn on your feed pump. Leave the reactor recirc pump off for now and run the pump until water starts to run from the effluent pipe. Give the reactor a bit of a shake to force any trapped air to the top and wait for all the air to escape from the effluent pipe.
When the reactor is clear of air turn on the recirculation pump, if using Rowalith C+ media the media should start to slowly fluidise within the reactor. I have used large coral skeleton in the PF601s( 20-30mm) with excellent results, dont expect this to fluidise though.
Now reduce the effluent flow to around 30 drips per minute and the bubble rate to around 15 bubbles per min and refer to the following pages to tune the reactor for best output.
SETTING UP THE REACTOR
Deltec Calcium Reactors are fitted with a pH probe holder, (except PF509), however we do not believe that you need to use a pH controller to get the most out of the unit.
Calcium reactors work by reducing the acidity, pH of the water passing through it using CO2 until it dissolves the calcium carbonate which is held inside. This breaks down the media into calcium ions and carbonate ions both of which are required for growth of corals and buffering of the water.
Having installed the equipment according to the instructions you will need to balance the reactor to the demands of your aquarium. The reactor balances 3 parameters which are interlinked and all affect the calcium output from the reactor:
- Water flow rate through the reactor
- CO2 bubble rate
- Operation time for the reactor
After running at the starting level for 1-2 hours use an accurate test kit to measure the Dkh of the water flowing out of the reactor as this gives a relative measurement of the calcium level of the water. Deltec reactors can achieve a dkh of up to 80 when set up and operating at their max however we would recommend that you start with a level of 45-50.
Test kits like those by Salifert will only measure up to 16 Dkh from the contents of one syringe. Add a second and so on to read 32 and 48 from this test.
If the Dkh is lower than 45-50 then increase the CO2 bubble rate and leave the reactor to stand for another 2 hours before re-testing. The reactor is now running as it should be and the third adjustable parameter comes in to play.
During the day, whilst the lights are on, the algae within the corals use CO2 from the water for photosynthesis which naturally raises the pH. Use of a calcium reactor lowers the pH due to CO2 addition and therefore the best time to use it is whilst the lights are on to reduce this effect.
The ideal time for the reactor to run is therefore 9-12 hours per day whilst the lights are on. Set the solenoid on your CO2 set to switch the gas on and off for the relevent period of time - do not change the flow of water through the reactor.
Check the Dkh and calcium within your aquarium on a daily basis. If this is tending to rise then you can further reduce the period that the CO2 is switched on.
If it is tending to fall then you can either increase the time that the CO2 runs or increase the amount of water passing through the reactor. This second option would be recommended for the reasons explained above but means going back to the first steps where you increase and adjust the CO2 until the Dkh comes back into line at 45-50.
As the corals grow you will find that you need to adjust the 3 parameters accordingly to maintain a balance.
Topping up the Reactor
Remember that the only difference between the various increasing models of calcium reactor is the volume of media that each holds. It therefore makes no sense to allow the level in the reactor to fall too far before you top it back up again.
SETTING pH CONTROLLER
The pH needed to 'melt' the media will depend on the media used , typically though an internal reactor pH of between 6.1 - 6.5 will be required.
There are two key reactor settings that will need adjusting to tune the reactor and to maintain your systems demand for Calcium and Alkalinity. When setting up the reactor you will only need to test the effluent for Alkalinity as the reactor will produce Alkalinity and Calcium in balance. Therefore there is no need to check the effluent for Calcium if the reactor is producing the required levels of Alkalinity.
Effluent Rate:
To tune the reactor for best performance you first need to set the effluent rate. I suggest starting out with a slow drip rate of around 1 drop every two seconds (30 drops a minute). Once the reactor is set up this can be increased to match the demand of the tank. If using a fixed peristaltic pump ensure that it is rated correctly for the reactor. If the peristaltic pump specified or effluent output rate is set higher than the maximum working capacity of the calcium reactor you will find that the effluent Alkalinity (dkh ) will drop even if setting a very low pH within the reactor or high bubble rate. This is due to the contact time within the reactor being too short for the capacity of media it can hold.
Internal pH/Bubble Rate:
Once the initial effluent rate has been set we need to look at the CO2 bubble rate and if using a pH controller the internal pH of the reactor. If using a feed pump/variable drip rate set CO2 rate at a count of around twice that of the effluent drip rate, after leaving the reactor running for at least an hour check the effluent Alkalinity using an aquarium test kit (Salifert kit in low range mode is quite accurate). You are aiming for an effluent dkh of between 35-50dkh, if the effluent dkh is low increase the bubble rate slightly and test an hour later. Continue to do this until the target dkh is reached. This will be the optimum output for the reactor at the drip rate set.
If using a pH controller then set this initially to switch the C02 supply solenoid off at a ph of 6.5, adjust the CO2 bubble count to around 30 bubbles per minute to begin with. Leave this for two hours then check the controller display, the ph inside the reactor should have dropped down to the desired ph i.e. 6.5. If you find the pH has not dropped sufficiently slowly increase the bubble rate leaving an hour between each adjustment until the pH has dropped to that set on the controller.
Calcium reactors work best with a steady constant supply of CO2 so don't be tempted to crank up the bubble rate to reduce the ph quickly, this will result in the solenoid cycling on and off over short periods and possibly causing excess CO2 to build up in the reactor.
Once the desired pH has been reached check the effluent Alkalinity, the ideal Alkalinity should be between 35-50dkh. If the effluent Alkalinity is low drop the controllers pH by 0.1 and leave for an hour and check the effluent dkh again. You may find you have to increase the bubble rate with each adjustment of the controller to achieve the new pH limit set, this is normal. When you find the effluent dkh is between 35-50dkh your controller will be set at the correct pH required to 'melt' your media.
Remember to calibrate your pH probe before set up!
Final adjustments:
Once the reactor has been set up to achieve the optimum effluent alkalinity you will need to tune the reactor for system demand. With the reactor running check your systems alkalinity, write down the results and check the systems alkalinity again 24 hours later. If your systems alkalinity has dropped you will need to increase the output of the reactor to match demand. If using a feed pump adjust the effluent rate via the red control tap on the reactor ,you should aim to increase the output by around 25% from the base setting above. After an hour test the effluent dkh, if you find that effluent dkh has dropped increase the bubble rate to achieve the correct effluent dkh.
Check the aquarium alkalinity again 24 hours later and if needed follow the steps above to increase the reactors output again. Repeat these steps until you find the aquariums Alkalinity and Calcium demands are being met by the reactor.
If using a fixed peristaltic pump you can attempt to increase the reactors output dkh into its upper levels by increasing the bubble count, don't try and force the effluent dkh up too high though as this may result in the Media turning into a mush and CO2 building up in the reactor.
If using a pH controller you may wish to reduce the pH in the reactor in an attempt push up the effluent dkh, an internal ph of under 6.1 may result in gas building with the reactor and the media breaking down and becoming dusty.
It is important to test the Aquariums alkalinity 24 hours after any adjustment so demand can monitored and the reactor adjusted to suit as above It is advisable to only run the CO2 via a solenoid during the day and turn it off during the night, this is because the effluent from the reactor has a low pH.
During the day your aquarium pH will be higher due to coral/algae respiration within the aquarium. At night the pH will drop naturally and the reactor effluent may pull the aquarium pH down even further to undesirable levels, so depending on the pH stability of your system you may want to turn the CO2 off during the night and run it slightly harder during the day. Monitor the pH swing of the aquarium and if the pH swings by more than 0.2-0.3 during a 24 hour period it would be advisable to only run the Calcium reactor CO2 supply during the day. As an extra measure the use of a Kalkwasser stirrer that is set to dose during the night will help stabilise pH and add Calcium and Alkalinity to the system.
Key points:
- If you make adjustments to increase the effluent rates you will need to make appropriate adjustments to the CO2 rate to maintain effluent alkalinity
- Set the internal pH of the reactor to give the desired effluent Alkalinity, this will be the optimum pH for your media
- Set the effluent flow rate and effluent dkh to keep up with system demand, if the system Alkalinity increases then decrease the effluent amount and/or the effluent dkh via the bubble count (internal reactor Ph) and visa versa.
- Always specify the correct size calcium reactor for the aquarium, when you reach the maximum effluent rate for the reactor the effluent dkh will drop regardless of Ph or CO2 input. Its better to over spec a reactor and run it at half duty if needs be than choose one that’s too small and struggle with it.
- Decrease the on time of the C02 solenoid via a timer if you wish to turn off the CO2 supply at night to reduce pH swings.
- Adjust the CO2 count as low as possible to achieve the desired reactor pH if using a controller to prevent frequent on/off cycling of the solenoid Leave at least an hour after adjusting the reactor to test effluent dkh
- Don't attempt to throttle the effluent back via the red control tap if using a Peristaltic pump, this will damage the pump. Keep the tap open at all times.
- Always leave the reactor feed pump and recirc pump running.
- Make sure all CO2 fittings aren't leaking and a non return valve is in place to stop tank water entering the solenoid.